Saturday 18 July 2015

How to run any Version of Internet Download Manager in Ubuntu/Linux with full Firefox Integration.

Ask anybody "Which is the best Download Manager ?". Ninty percent of the time you will get same answer "Internet Download Manager". With it's simple design yet powerful features, IDM is best download manager for sure. I'm gonna show you how to use latest version of IDM in any linux OS, yes you heard it right "latest version of IDM". Till wine 1.7.4x, it only supported an older version of IDM which was IDM 5.05. It was functional but shitty version when we look at newer versions of IDM with added new features. So just follow this step by step guide to get your IDM working.

So I have divided this Post in 3 parts:
  • Installing "Internet Download Manager"
  • Integrating IDM with Firefox.
  • Make IDM look Good.

Installing "Internet Download Manager"
As you know IDM is a window's application. So to run IDM on linux we need something that supports Windows apps in linux. Wine (Wine is not an emulator) is a free and open source compatibility layer software application that aims to allow applications designed for Microsoft Windows to run on Unix-like operating systems.

To install wine run following commands:

sudo add-apt-repository ppa:ubuntu-wine/ppa    
sudo apt-get update && sudo apt-get install wine1.7 winetricks

Note:- Make sure the Wine version installed is atleast 1.7.44. Because the older version of wine even 1.7.43 may not support latest version of IDM.
 
After you are finished with installing wine, you need to install IDM. Get latest version of IDM from internetdownloadmanager.com
 
Open the downloaded setup file with "Wine Windows Program Loader" and follow instructions. after installing IDM it will look as shown in screenshot below:


Alrighty you have installed IDM but it doesn't look good. does it??. Don't worry we will handle this look thing just after we will be done with Firefox integration Part.

Integrating IDM with Firefox Web Browser.
Downloader's integration with Web Browsers is a must thing. Copying links from Browsers and pasting them in Download Managers would be a stupid thing to do. So let us integrate IDM with Mozilla Firefox.  

To integrate with Firefox we need an Extension named "Flashgot". Flashgot is an Extension that allows you to download all links with your favourite Downloader with a single click. To install Flashgot goto Tools>Add-ons and type "flashgot" in searchbox and install FlashGot Mass Downloader x.x.x.xx.
Next thing we need to do is to enable Wine Apps for FlashGot in order to use IDM. To do this type "about:config" in Firefox address bar and search for "wine". Now Toggle the value of Flashgot.useWine to true.

Now goto Extentions and edit flashgot preferences. Under General Tab In Download Manager select "Internet Download Manager" and under Download tap Select "Intercept all Downloads". Click OK.

Congratulations you have completed the IDM installation with full firefox integration.

Make IDM look Good and Verifying IDM Setup:-
This part is pretty easy. Just follow some simple steps:
  • Download Luna theme for wine and extract the downloaded file. (if this file is downloaded with IDM then our configuration is done properly and IDM Setup is also verified).
  • Open "Configure Wine" from launcher . Go to "Desktop Integration" tab and hit install button and select your theme with ".msstyles" extension.
  • Now from drop down list select VistaPerfectionX4 and hit apply   
You can see how IDM will look after applying this theme:


Do hit g+ button if You liked the Post.

Tuesday 5 August 2014

How to Turn Your Laptop Into WiFi Hotspot Without Using Any Software

Turning your laptop into wireless hotspot is a 5 step process.

Requirments:-
1. A computer with WiFi Adapter.
2. An active Internet Connection.

Step 1:
Open Command Prompt with Administrative Privileges. To do this go to start then type cmd then right click on cmd and select "Run as Administrator".

Step 2:
Run following command: netsh wlan set hostednetwork mode=allow ssid="My Hotspot" key=mypassword

You can change "My Hotspot" and "mypassword" in above command to any other value of your choice.

Step 3:
Congratulations you just created your wifi hotspot. you just need to start it and do little bit settings for first time. To start your hotspot run following command:

netsh wlan start hostednetwork


Step 4:
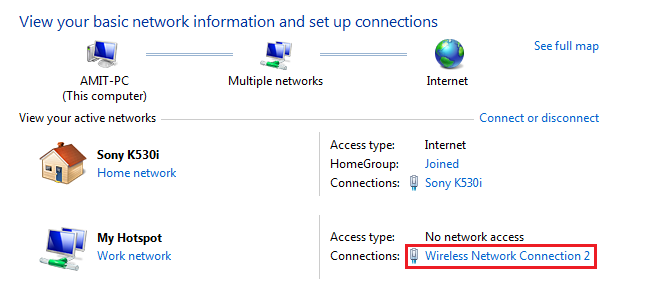
Goto "Control Panel > Network and Sharing Center > Change Adapter Settings" and then right click on the connection you are currently connected to (dialup, Ethernet or WiFi) and then click on properties. In the sharing Tab check "Allow other network users to connect through this computer's Internet Connection". Under "Select a Private Network Connection" Select your Hotspot Adapter. You can check this in your Network and Sharing Center. See Image Below.

So in this case you will select "Wireless Network Connection 2". And click ok. Now you should be able to connect to internet.


Step 5:
Your hotspot is ready now, you can actually connect to your hotspot but it will show limited connection for now. you just need to stop it and start  it again. In order to stop hotspot run following command: 

netsh wlan stop hostednetwork

followed by:

netsh wlan start hostednetwork


Now your hotspot has started transmitting. You can see your hotspot in your smartphone's wifi Networks. But this is not the end. You can connect to hotspot but will not be able to connect to internet until you allow internet sharing for the interface you are connected to. To allow internet sharing follow step 4.

Do hit g+ button if you like the post.

Saturday 11 May 2013

How to use Two Fingers Tap as Right Click on Synaptic Touchpad Systems (Updated)


Here is the step by step solution for making 2 Fingers Tap as Right/Secondary Click. Just follow the steps... 
  1. Press Win+R keys to open run, type regedit and hit enter to open Registry Editor.
  2. Go to "HKEY_CURRENT_USER\Software\Synaptics\SynTP\TouchPadPS2". If you don't find "TouchPadPS2" and another entry named "TouchPadSMB2c" exists under SynTP then click on "TouchPadSMB2c". If you don't find "SynTP" key then read note at end of the post. 
  3. On the right double click on "MultiFingerTapFlags" entry and update its value to 3.
  4. On the right double click on "2FingerTapAction" entry and update its value to 2.


   5.  Press OK and Exit.
   6.  Log Off and start Windows.

Note:- If you don't find any of the above key then you have to manually create it. Right Click on Synaptics click on New Key and Give it name ""SynTP". Now similarly create a key named "TouchPadPS2" under "SynTP". Now under "TouchPadPS2" create new "DWORD (32 bit) Value" with name "2FingerTapAction". Double Click it and Change its Value to 2. Logoff and Start Windows.

Do hit g+ button if You like the Post.


Tuesday 9 October 2012

How To Run NFS Most Wanted Game in Full screen Mode Solved

This Trick will work for all games that won't run in widescreen mode. It forces Your Graphics Software to scale in full screen.
  • Press windows + R on the keyboard or go to “Start Menu -> Accessories -> Run” to open “Run”.
  • Type “regedit”. Registry Editor will open.
  • Go to “HKEY_LOCAL_MACHINE -> SYSTEM -> ControlSet001 -> Control ->GraphicsDrivers -> Configuration -> LGD02100_00_07D9…… -> 00 -> 00”  
  • Note: The above directory named “LGD02100_00_07D9……” can have different name on your system according to ur video drivers. The configuration directory can contain more than one sub directories then do set scaling value for all of them.
  • On the right side area you will see a key named “Scaling”.
  • Double click on it and change the “Value Data” field to 3. Base will be “Hexadecimal”.


  •  The “Value data” key means different for different values:
             2 > Center Image
             3 > Scale Full Screen
             4 > Maintain Aspect Ratio
  • Click OK and close Registry Editor.
  • Your problem should be solved.
  • If still not solved try different value (2 or 4 not any other numbers). But most probably it will be 3 as it worked for me.
Plz do hit g+1 button below this post.

You may also like: How to turn your Laptop into WiFi Hotspot without using any tool.